Grime Scene no. 10: Unveiling the Magic of Charcoal Drawing Step-by-Step
- Stuart Jarvis
- Jul 8, 2024
- 2 min read

I think art's magic lies not just in the final masterpiece but in the creation journey.
Today, we'll explore those half-finished pieces, experimental sketches, and meticulous steps that shape each drawing.
Through silent storytelling, art communicates where words fail.
Tip #1: Laying the Groundwork – A Charcoal Foundation

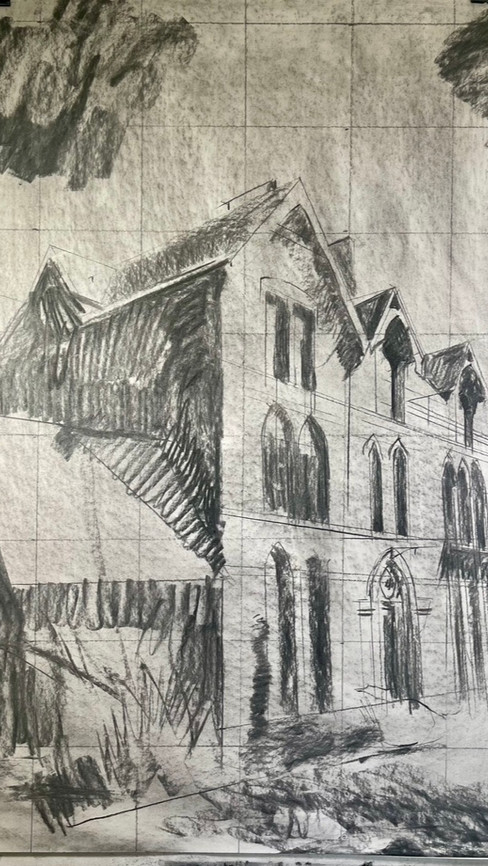
All drawings for me start with preparing your paper. I mainly like the freedom of A1 paper, and the first layer is always a solid ground of charcoal. If you're using a photograph, compose a grid over it using an app like 'Grid.' Correspond this grid onto your paper with light charcoal strokes using a metre ruler.

Tip #2: Light, Loose, and Liberal – Begin with Broad Strokes
Start your drawing with broad, light strokes, keeping your hand loose. The aim is to establish the composition without getting bogged down in details too early. This stage is all about laying down the form and basic structure, ensuring that your proportions and placements are sound before delving deeper.


Tip #3: Blend and Build – Layering Charcoal
Once your initial outline is ready, it's time to work the charcoal into the paper. Utilize blending sticks or even your fingers to smooth and integrate the charcoal. This foundational layer is crucial for creating a unified base that you will build upon with darker tones and highlights.
Tip #4: Dark to Light – Deepening the Tones


After your initial layer, start adding depth by working in darker charcoal. Develop your drawing systematically, rather than over-focusing on any single area. Use a putty rubber to lift off charcoal and reveal lighter areas, crafting your highlights and enhancing the drawing's three-dimensionality.
Tip #5: Fix and Finish – Setting Your Work
Once you're satisfied with the tonal range and detail, take the drawing outside to spray a layer of fixative. Hairspray can be a good substitute in a pinch. The fixative will secure the charcoal to the paper, making it impossible to lift off. This step is crucial before making any final dark touches, ensuring that your reclaimed highlights won't be disturbed.


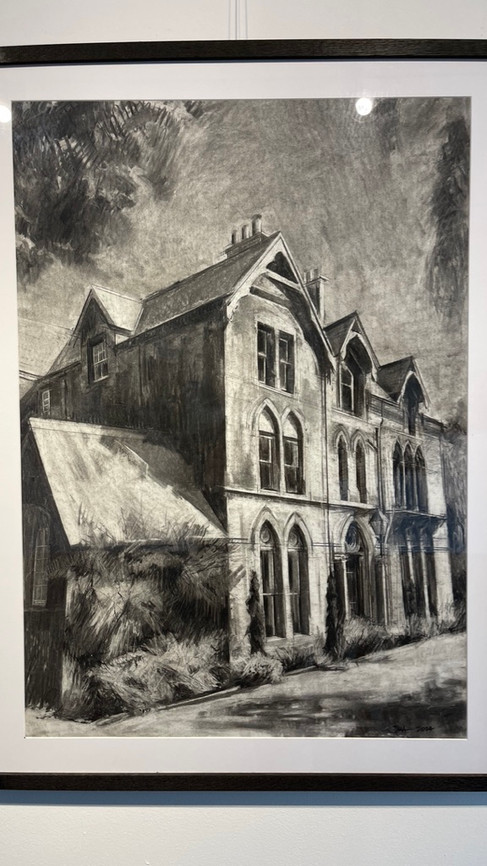
Conclusion: Everyone Can Master Charcoal
With this structured approach, anyone can achieve stronger compositions and delve deeply into the expressive potential of charcoal. Master these steps, and you'll find a world of possibilities opening up in your drawing practice. Stay tuned for more tips in the coming weeks, as we explore the finer subtleties of handling this powerful medium. A short preview below of the drawing I'll be using in question. Check out my Instagram for more info.
---


Thank you for joining me on this journey behind the scenes of charcoal drawing. Make sure to share your thoughts and questions in the comments below. Keep experimenting and happy drawing!
#GrimeScene #ArtProcess #CharcoalDrawing #ArtTips #CharcoalArt #DrawingTutorial #StepByStep #ArtisticJourney #ArtisticProcess #ArtExploration #ArtInspiration #CreativeProcess #CharcoalTechniques #ArtBlog #A1Paper #DrawingSkills #ArtistLife #ArtCommunity #ArtEducation #VisualArt #ArtisticExpression #Sketching #DrawingTechniques #CharcoalSketch #Fixative #ArtisticDevelopment #ArtBlogging


Comments